The Saved Work area contains all of your folders and within them, your saved files.
This chapter addresses the following subjects.
The Saved Work area, below.
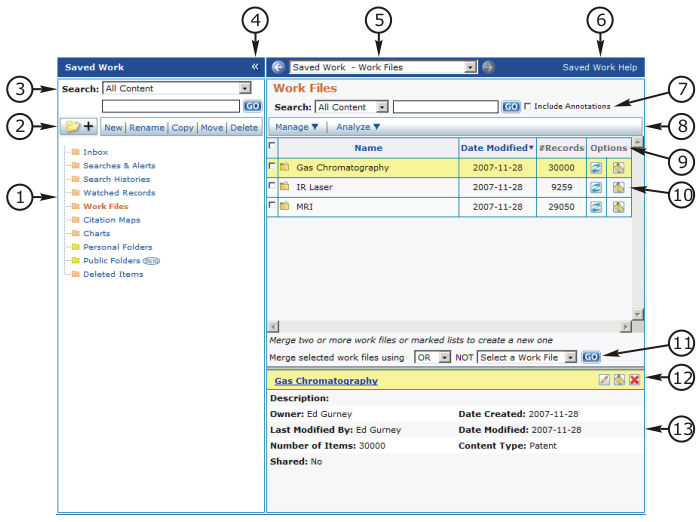
Saved Work Area Features
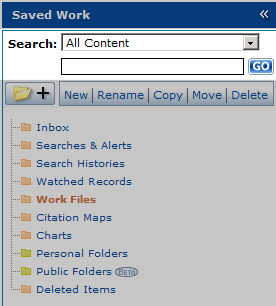
The Folders Panel
The Folders Panel Toolbar
The Folders Search Tool
The Collapse/Expand Panel Tool
The Breadcrumb Navigation Tool
The Saved Work Help Link
The Folder Contents Search Tool
The Folder Contents Toolbar
The Column Headings
The Record Row
The Merge Files Tool
Properties Panel Tools
The Properties Panel
Thomson Innovation enables you to create and save seven different file types. Files you create are stored each in their own default folder. Only files of a given type may be stored in a given folder. You may not change these defaults.
The default file types and their folders are
|
File Type |
Default Folder |
|
Mail Message |
Inbox |
|
Saved Search or Alert |
Searches & Alerts |
|
Search History |
Search Histories |
|
Watched Record |
Watched Records |
|
Work File |
Work Files |
|
Citation Map |
Citation Maps |
|
Chart |
Charts |
Files vs. File References – An Important Distinction
Innovation stores each file created by you in its default folder. When you copy a file into the Personal or Public folder, you create a file reference. It is not a duplicate of the original file: it is a reference to the original file.
Any editing or annotation of the file reference also edits or annotates the original file. Any editing or annotation of the original file also edits or annotates the file reference. Deleting the original file deletes all of its file references. Deleting a file reference does not delete the original file.
Your default folders may contain only original files. They cannot contain file references.
Your Personal or Public folders may contain only file references. They cannot contain original files.
For simplicity, this manual refers to either as a file.
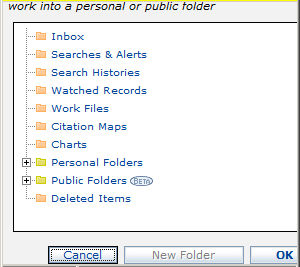
The Folder area contains ten folders. Seven are described above. The remaining three are
Personal Folder
Public Folder
Deleted Items
Personal Folder
You can add files and create subfolders in your Personal Folder in order to organize your work in a way that makes sense to you. You can create folders and subfolders in your Personal Folder.
You may rename, copy, move or delete any folders in your Personal Folder.
Your Personal Folder contains file references, rather than actual files. For this reason, you may place files of any type into a single folder.
Public Folder
You and the members of your work group can use Public Folders to share any type of Thomson Innovation file with one another. You can create folders and subfolders in Public Folders.
When you open Public Folders, you will see all the folders created by other members of your work group, as well as those you have created yourself. You are the owner of folders and folder contents that you have created yourself, and you may rename or delete these folders. You may not rename or delete folders created by others. You may not copy or move a public folder, even if you are the owner.
Your Public Folder contains file references, rather than actual files. For this reason, you may place files of any type into a single folder.
Deleted Files
Any files you delete from your other folders are retained in your Deleted Files Folder until open the folder, select the files, and click Permanently Delete.
You can recover a file or folder from the Deleted Items folder by first selecting it, then clicking Manage on the Folder Contents Tool Bar, then clicking Move.
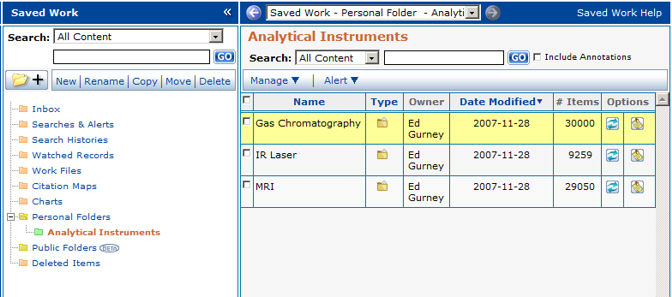
In the example above, the user has created a subfolder named after his project, and has placed three Work Files in the folder.
|
|
|
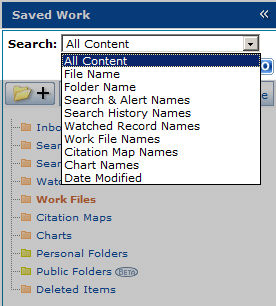
Use the Folders search tool to perform a keyword search of the properties of all your folders and files. Search All Content, or narrow your search by selecting a category from the drop-down list. Note that the Folders search tool can only search file properties. The text of a record cannot be searched because the files contain links to records, not the records themselves.
Enter the search term exactly as it is used; stemming and wild cards are not available.
The search tool is not case sensitive.
Available search categories include:
All Content
File Name
Folder Name
Search & Alert Names
Search History Names
Watched Record Names
Work File Names
Citation Map Names
Chart Names
Date Modified
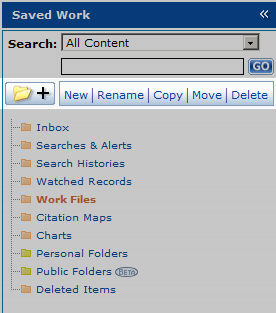
Collapse/Expand All Icon
Click the Collapse/Expand All icon  to collapse or expand the Folder Tree. Expanding
the tree displays all of your folders, including those located inside
of other folders. Only folders are shown in the Folder Tree; files
within folders are displayed in the Folder Contents panel.
to collapse or expand the Folder Tree. Expanding
the tree displays all of your folders, including those located inside
of other folders. Only folders are shown in the Folder Tree; files
within folders are displayed in the Folder Contents panel.
|
Folder Tree Collapsed |
|
Folder Tree Expanded |
|
|
|
|
New

To create a new folder click New to display the Create New Folder popup, shown below.

New folders are created within the selected folder. You may only create folders within the Personal Folder or the Public Folder
Rename

To rename a folder, click Rename to display the Rename Folder popup, shown below.

This renames the selected folder. You may rename any folder you have created.
Copy

Click Copy to display the Select Folder popup, shown below.
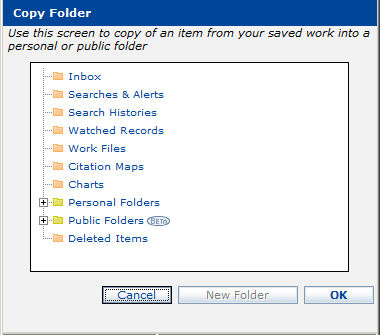
This copies the selected folder and its contents into another folder. The target folder must be within either the Personal Folder or the Public Folder.
Move

Click Move to display the Select Folder popup, shown above.
This moves the selected folder and its contents into another folder. Both the source and the target folders must be within your Personal Folder.
Delete

Delete the selected subfolder. Only subfolders in the Personal Folder or subfolders you own in the Public Folder may be deleted.
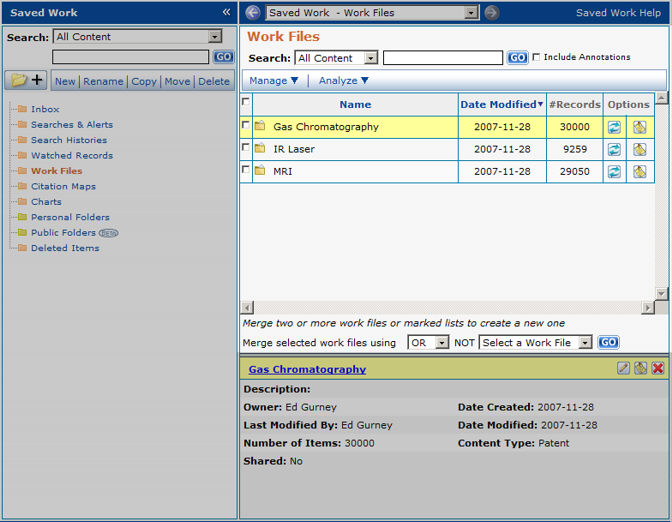
Above, the Folder Contents panel is shown with the Work Files folder selected.
The configuration of the tools and icons available in the Folder Contents panel varies depending on the contents of the folder you have chosen to view, as well as on the particulars of your subscription.
This topic describes the following folder views.
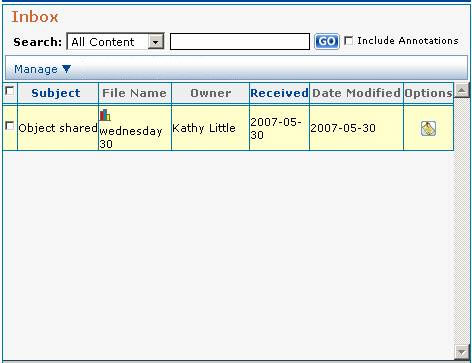
Search

Find specific messages in your inbox by searching the subject, the date received, or both.
When searching the subject, you may use a partial string. Searching on the letter A finds all messages with the letter A in the subject. The inbox search tool is not case sensitive.
When searching the date, a full and complete date must be entered.
To include the text of annotations in your search, check the Include Annotations checkbox.
Manage
To copy selected messages, click Copy.
To move selected messages, click Move.
To delete selected messages, click Delete.
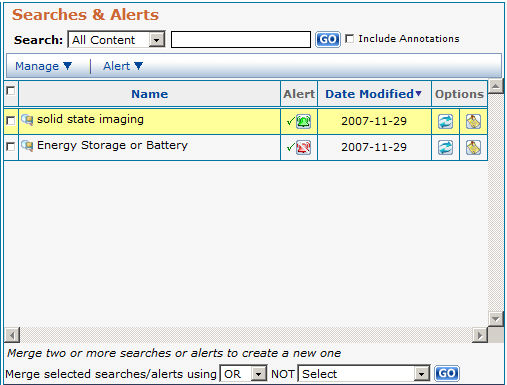
Search

Find specific files in your Searches & Alerts folder by searching the file name, the date rmodified, or both.
When searching the file name, you may use a partial string. Searching on the letter A finds all messages with the letter A in the file name. The searches & alerts search tool is not case sensitive.
When searching the date, a full and complete date must be entered.
To include the text of annotations in your search, check the Include Annotations checkbox.
Manage
The Manage tool acts on the file or files you have selected in the Folder Contents panel. Available actions include:
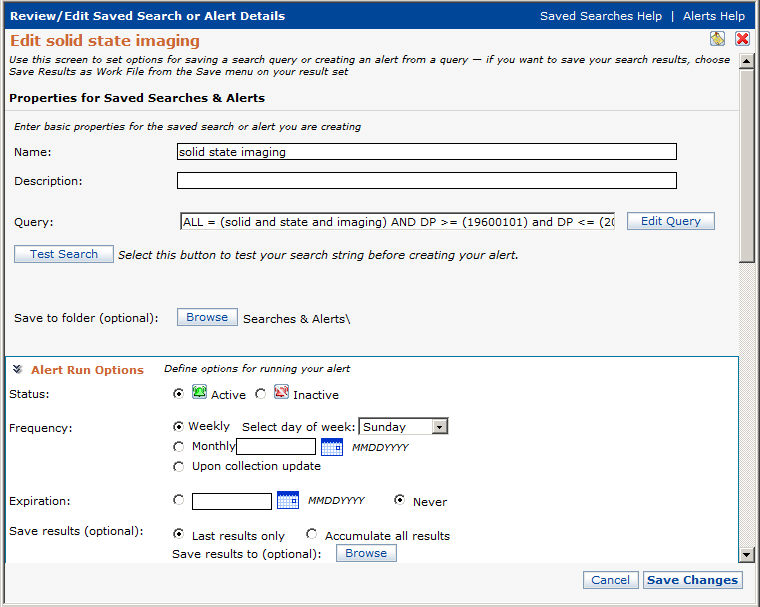
View or edit properties or alert settings of the selected saved search by clicking Edit to view the Review / Edit Saved Search or Alert Details panel, shown below.
Run the selected saved search by clicking Open/Run/Execute.
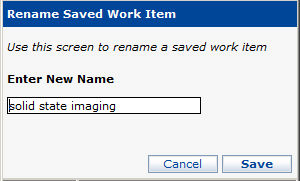
Rename the selected saved search by clicking Rename and using the Rename Objects panel, shown below.
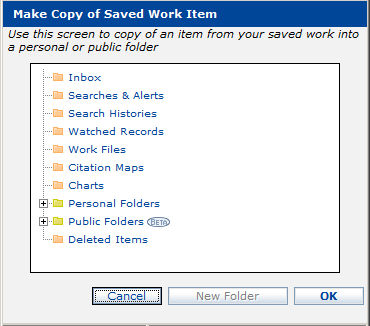
Copy the selected file or files to another folder. Click Copy to select a destination folder using the Copy Objects dialog, shown below.
Delete the selected saved search by clicking Delete.
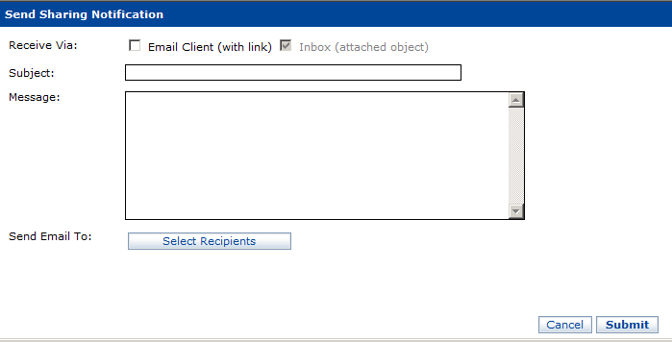
Share the selected file or files in your work group. Optionally, include a message. The Send Sharing Notification panel is shown below.
Alert
To create an alert for a selected saved search that does not currently have an alert, click Set. The Review/Edit Saved Search or Alert Details panel displays.
To toggle the activation status of an alert on a selected saved search, click Activate/Deactivate.
To add or remove your email address from the alert recipient list, click Receive/Do Not Receive.
Icons in the alert column of the folder contents panel indicate the status of your alerts. See below.
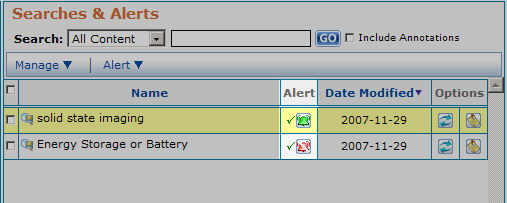
The red bell  indicates that your
alert in inactive.
indicates that your
alert in inactive.
The green bell  indicates that
your alert is active.
indicates that
your alert is active.
The green check mark  indicates
that you are on the alert recipient list.
indicates
that you are on the alert recipient list.
The Rerun Tool
Click the Rerun icon  to run its
associated search or alert immediately.
to run its
associated search or alert immediately.
The Annotation Tool

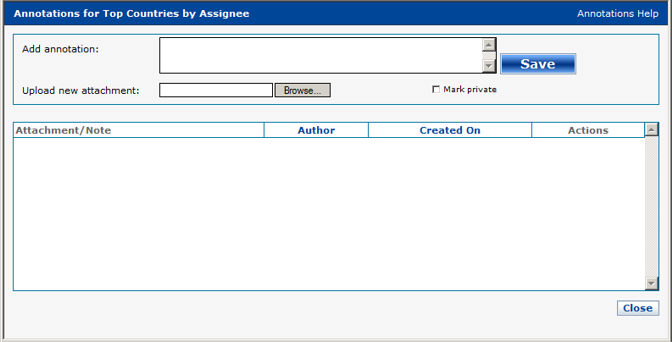
You can add one or more Annotations to any selected file in any Folder Contents view. You can also annotate any selected record within a Work File. An annotation can contain a note, an attached file, or both. Click the Annotation icon to open the Annotation panel, below.
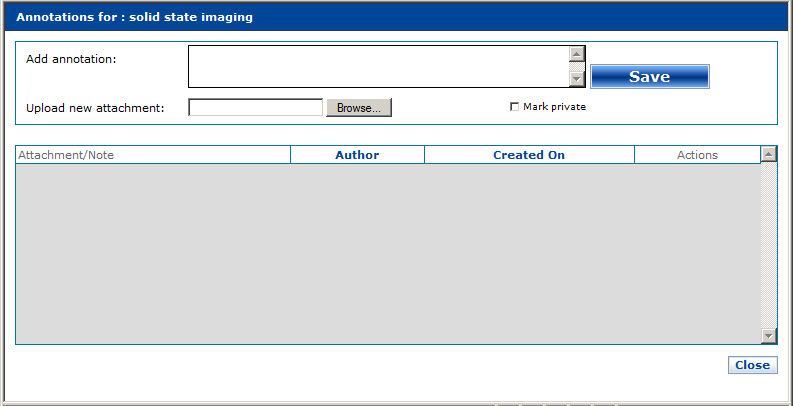
To Create a New Annotation
1. Select a file or a record in the Folder Contents panel for which you wish to create an Annotation by checking the checkbox to the left of the file name. Select only one file or record at a time.
2.
Click the Annotation icon to open the Annotation
panel.
3. Type your note into the text input field.
4.
If you wish to attach a file from your local machine to the Annotation,
click the Browse button  to open the Choose File
panel.
to open the Choose File
panel.
5.
Use the tree structure to navigate to the file you wish to attach,
select it, and click the Open button  .
.
Click the Cancel button  to
close the Upload New Attachment panel without saving.
to
close the Upload New Attachment panel without saving.
6.
Click the Save button  to save your Annotation.
7.
Click the Finish button  to close the Annotation
panel. Note that after you have created an annotation, the annotation
icon
to close the Annotation
panel. Note that after you have created an annotation, the annotation
icon  includes a green check mark.
To Edit an Existing Annotation
1. Select a file or a record in the Folder Contents panel you wish to edit by checking the checkbox to the left of the file name. You may select only one file or record at a time.
2.
Click the Annotation icon to open the Annotation
panel.
3.
Click the Edit icon  in the Actions column.
Note the Edit icon is only available after you save the annotation.
in the Actions column.
Note the Edit icon is only available after you save the annotation.
4. Edit your note in the text field.
5.
Click the Save button  to save your Annotation.
6.
Click the OK button to close the Annotation
panel
To Delete an Existing Annotation
1. Select a file or a record in the Folder Contents panel whose annotation you wish to delete by checking the checkbox to the left of the file name. You may select only one file or record at a time.
2.
Click the Annotation icon to open the Annotation
panel.
3.
Click the Delete icon  in the Actions column.
4.
Click the Save icon to save your Annotation.
5.
Click the OK button to close the Annotation
panel
Merging
You can merge, or combine, two or more saved searches to create a new saved search using the Merge feature. See below.
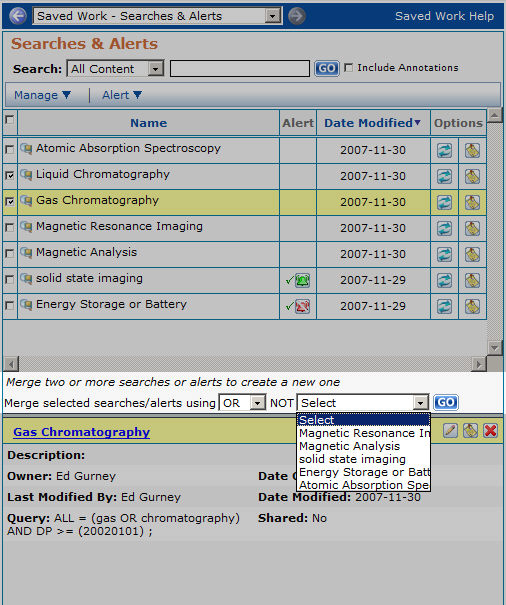
Select the saved searches you wish to merge by checking their checkboxes.
Select the Boolean operator you wish the merge to use. The default is OR. AND is also available.
Optionally, select a saved search from the NOT dropdown list to exclude its search terms from the merged saved search.
Press the GO
button 
Give the new saved search a name using the Merge Saved Searches & Alerts panel, shown below. Optionally, add a description.
Press the Save
button  . The
new saved search is now shown in your Searches & Alerts folder view.
. The
new saved search is now shown in your Searches & Alerts folder view.
Any alerts that were associated with the searches you merged are not carried over to the new saved search.

Search

Find specific files in your Search Histories folder by searching the file name, the date modified, or both.
When searching the file name, you may use a partial string. Searching on the letter A finds all messages with the letter A in the file name. The Search Histories search tool is not case sensitive.
When searching the date, a full and complete date must be entered.
To include the text of annotations in your search, check the Include Annotations checkbox.
Manage
Edit the properties of the selected search history file by clicking edit to display the Saved Search History Setup panel, shown below.
To view the selected search history, click Open/Run/Execute. See the Search History chapter for detailed information.
To rename the selected saved search history, click Rename to display the Rename Objects dialog, shown below.
Note that you cannot rename your temporary search history. Only search histories you have saved can be renamed.
To copy the selected saved search history to the personal folder, click copy to display the Copy Objects dialog, shown below, and select the target folder.
Note that you cannot copy your temporary search history. Only search histories you have saved can be copied.
To delete the selected search history, click delete.
Share the selected file or files in your work group. Optionally, include a message. The Send Sharing Notification panel is shown below.
Search

Find specific files in your Watched Records folder by searching the file name, the date modified, or both.
When searching the file name, you may use a partial string. Searching on the letter A finds all messages with the letter A in the file name. The watched records search tool is not case sensitive.
When searching the date, a full and complete date must be entered. Select Date Modified, then click in the text entry box to open the date selector tool, shown below.
Manage
The Watched Records Manage tool acts on the file or files you have selected in the Folder Contents panel.
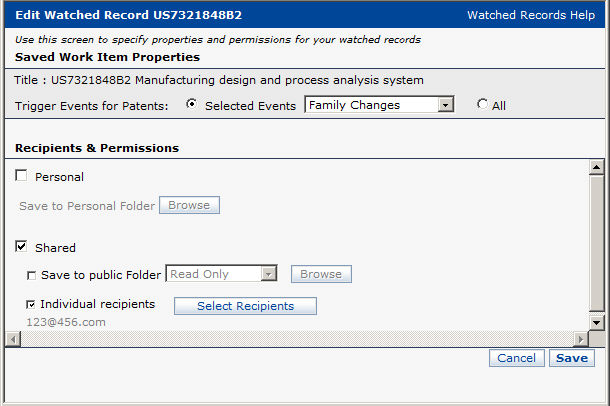
To view or edit the settings of the selected watched record, click Edit to display the Edit Watched Record panel, shown below.
To view the selected watched record, click Open/Run/Execute.
To copy the selected watched record to the personal folder, click copy to display the Copy Objects dialog, shown below, and select the target folder.
Share the selected file or files in your work group. Optionally, include a message. The Send Sharing Notification panel is shown below.
To remove the selected watched record from the watched record list, click Remove Watched Records.
Search

Find specific files in your Work Files folder by searching the file name, the date modified, or both.
When searching the file name, you may use a partial string. Searching on the letter A finds all messages with the letter A in the file name. The work files search tool is not case sensitive.
When searching the date, a full and complete date must be entered.
Manage
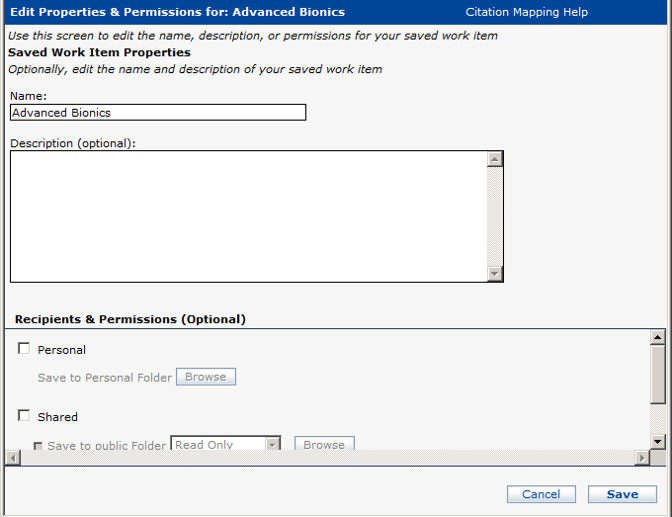
Edit the properties of the selected work file by clicking edit to display the work file properties panel, shown below.
To view the selected work file, click Open/Run/Execute.
To rename the selected work file, click Rename to display the Rename Objects dialog, shown below.
To copy the selected work file to the personal folder, click copy to display the Copy Objects dialog, shown below, and select the target folder.
To delete the selected work file from the work file folder, click Delete.
Share the selected file or files in your work group. Optionally, include a message. The Send Sharing Notification panel is shown below.
Analyze
Click Analyze then Charts to create a chart based on the selected work file. Please see Charts for details.
Merging
You can merge, or combine, two or more work files to create a new work file using the Merge feature. See below.
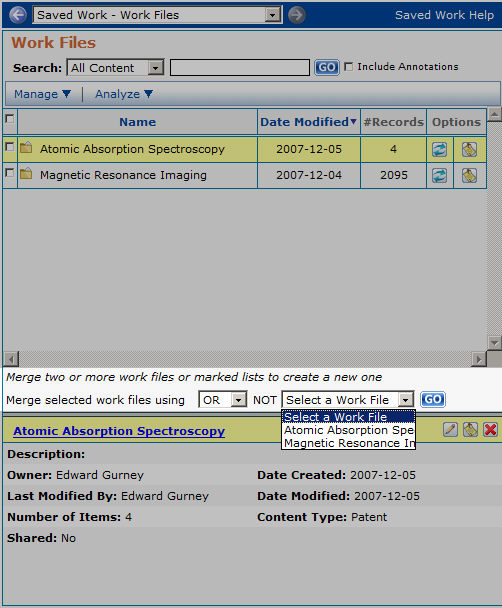
Select the work files you wish to merge by checking their checkboxes. Note that you can include a marked list in a merge.
Select the Boolean operator you wish the merge to use. The default is OR. AND is also available.
Optionally, select a work file from the NOT dropdown list to exclude its records from the merged saved search.
Press the GO
button
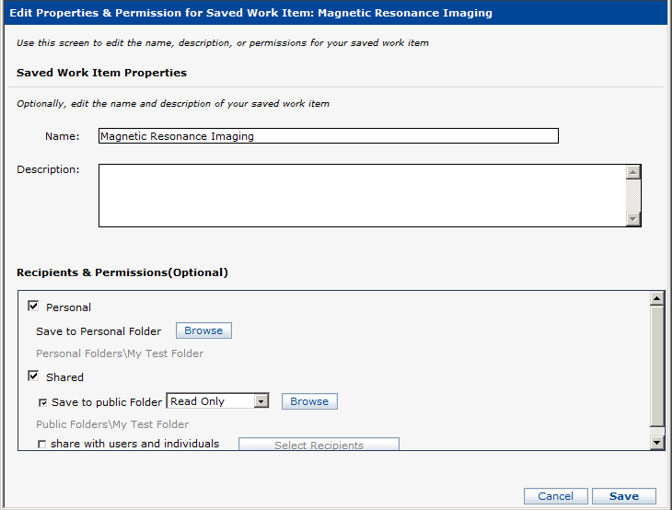
Give the new work file a name using the Work File Properties & Permissions panel, shown below. Optionally, add a description.
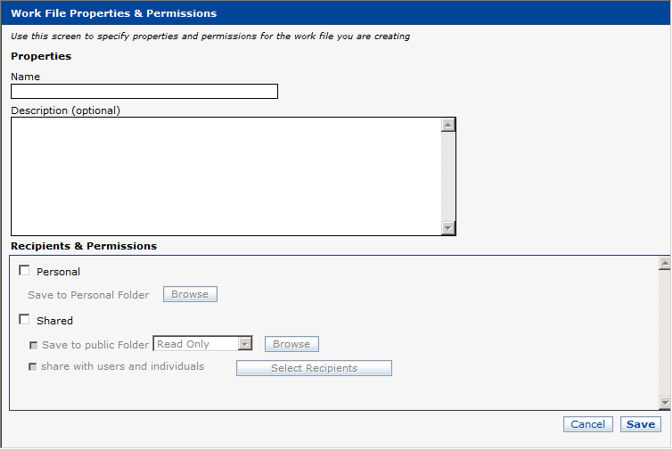
Press the Save
button . The
new work file is now shown in your Work Files folder view.
Search
Find specific files in your Citation Maps folder by searching the file name, the date modified, or both.
When searching the file name, you may use a partial string. Searching on the letter A finds all messages with the letter A in the file name. The citation maps search tool is not case sensitive.
When searching the date, a full and complete date must be entered.
Manage
Edit the properties of the selected citation map by clicking edit to display the Edit Citation Map panel, shown below.
To view the selected work file, click Open/Run/Execute.
To rename the selected citation map, click Rename to display the Rename Objects dialog, shown below.
To copy the selected citation map to the personal folder, click copy to display the Copy Objects dialog, shown below, and select the target folder.
To delete the selected citation map from the work file folder, click Delete.
Share the selected file or files in your work group. Optionally, include a message. The Send Sharing Notification panel is shown below.
To save a list of all the patent records referenced in the selected citation map, click Save as Work File.

Search

Find specific files in your Charts folder by searching the file name, the date modified, or both.
When searching the file name, you may use a partial string. Searching on the letter A finds all messages with the letter A in the file name. The work files search tool is not case sensitive.
When searching the date, a full and complete date must be entered.
Manage
The Charts Manage tool acts on the file or files you have selected in the Folder Contents panel.
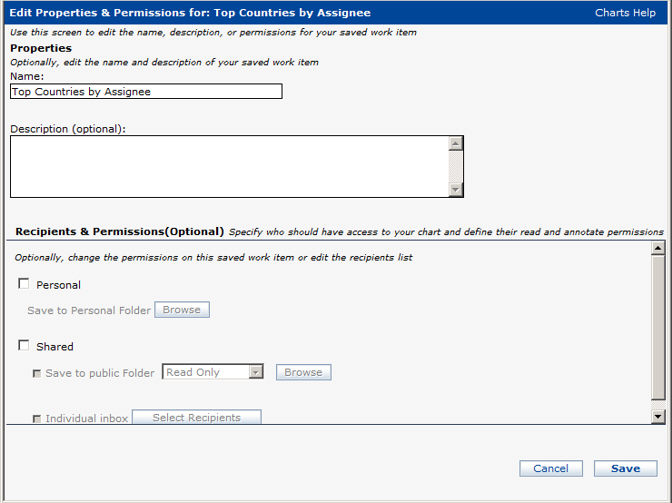
Edit the properties of the selected chart by clicking edit to display the Save Chart panel, shown below.
To view the selected chart, click Open/Run/Execute.
To copy the selected chart to the personal folder, click copy to display the Copy Objects dialog, shown below, and select the target folder.
To remove the selected chart from the work file folder, click Delete.
Share the selected chart with others in your group by sending them either an attachment or a link to a file via email. Click Share to select recipients and compose your message using the Send Message panel, shown below.
Create Template
Click Create Template to open the Chart Template dialog. See Charts for a complete description.
A file is data. Properties are the structured description of that file. In other words, properties are data describing data.
In Work File Folder View, click the hyperlink at the top of the panel to open the work file. In other folder views, the hyperlink produces other results.
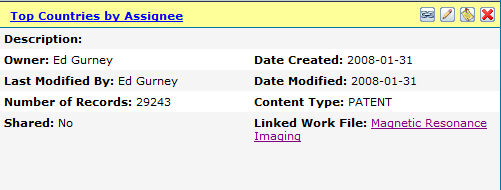
The File Properties panel displays the properties of the file selected in the Folder Contents panel.
The Display Work File Tool

Click to display the work file linked to this chart.
The Edit Tool

Click the Edit tool to edit the properties of the selected file.
You can add one or more Annotations to any selected file in any Folder Contents view. You can also annotate any selected record within a Work File. An annotation can contain a note, an attached file, or both. Click the Annotation icon to open the Annotation panel, below.
To Create a New Annotation
1. Select a file or a record in the Folder Contents panel for which you wish to create an Annotation by checking the checkbox to the left of the file name. Select only one file or record at a time.
2.
Click the Annotation icon to open the Annotation
panel.
3. Type your note into the text input field.
4.
If you wish to attach a file from your local machine to the Annotation,
click the Browse button to open the Choose File
panel.
5.
Use the tree structure to navigate to the file you wish to attach,
select it, and click the Open button .
Click the Cancel button to
close the Upload New Attachment panel without saving.
6.
Click the Save button to save your Annotation.
7.
Click the Finish button to close the Annotation
panel. Note that after you have created an annotation, the annotation
icon includes a green check mark.
To Edit an Existing Annotation
1. Select a file or a record in the Folder Contents panel you wish to edit by checking the checkbox to the left of the file name. You may select only one file or record at a time.
2.
Click the Annotation icon to open the Annotation
panel.
3.
Click the Edit icon in the Actions column.
Note the Edit icon is only available after you save the annotation.
4. Edit your note in the text field.
5.
Click the Save button to save your Annotation.
6.
Click the OK button to close the Annotation
panel
To Delete an Existing Annotation
1. Select a file or a record in the Folder Contents panel whose annotation you wish to delete by checking the checkbox to the left of the file name. You may select only one file or record at a time.
2.
Click the Annotation icon to open the Annotation
panel.
3.
Click the Delete icon in the Actions column.
4.
Click the Save icon to save your Annotation.
5.
Click the OK button to close the Annotation panel
The Delete Tool

Click the Delete tool to delete the selected file.
This has the same result as clicking MANAGE then DELETE in the Folder Contents panel, with the exception that if the file is to be deleted from the Folder Contents panel, it must first be selected by checking its checkbox.